Direct answer. To print a photo at an exact physical size on Mac, set the Photo Frame width and height in millimeters, centimeters, or inches first (4 × 6 in is 101.6 × 152.4 mm), place the photo on a Page that matches the paper in the printer tray, check that nothing important sits outside the printer-reported printable area, then print through the macOS print panel at 100% scale with Scale to Fit off. Measure one test print with a ruler before committing to the full job.
How to print at exact size — the 6-step method
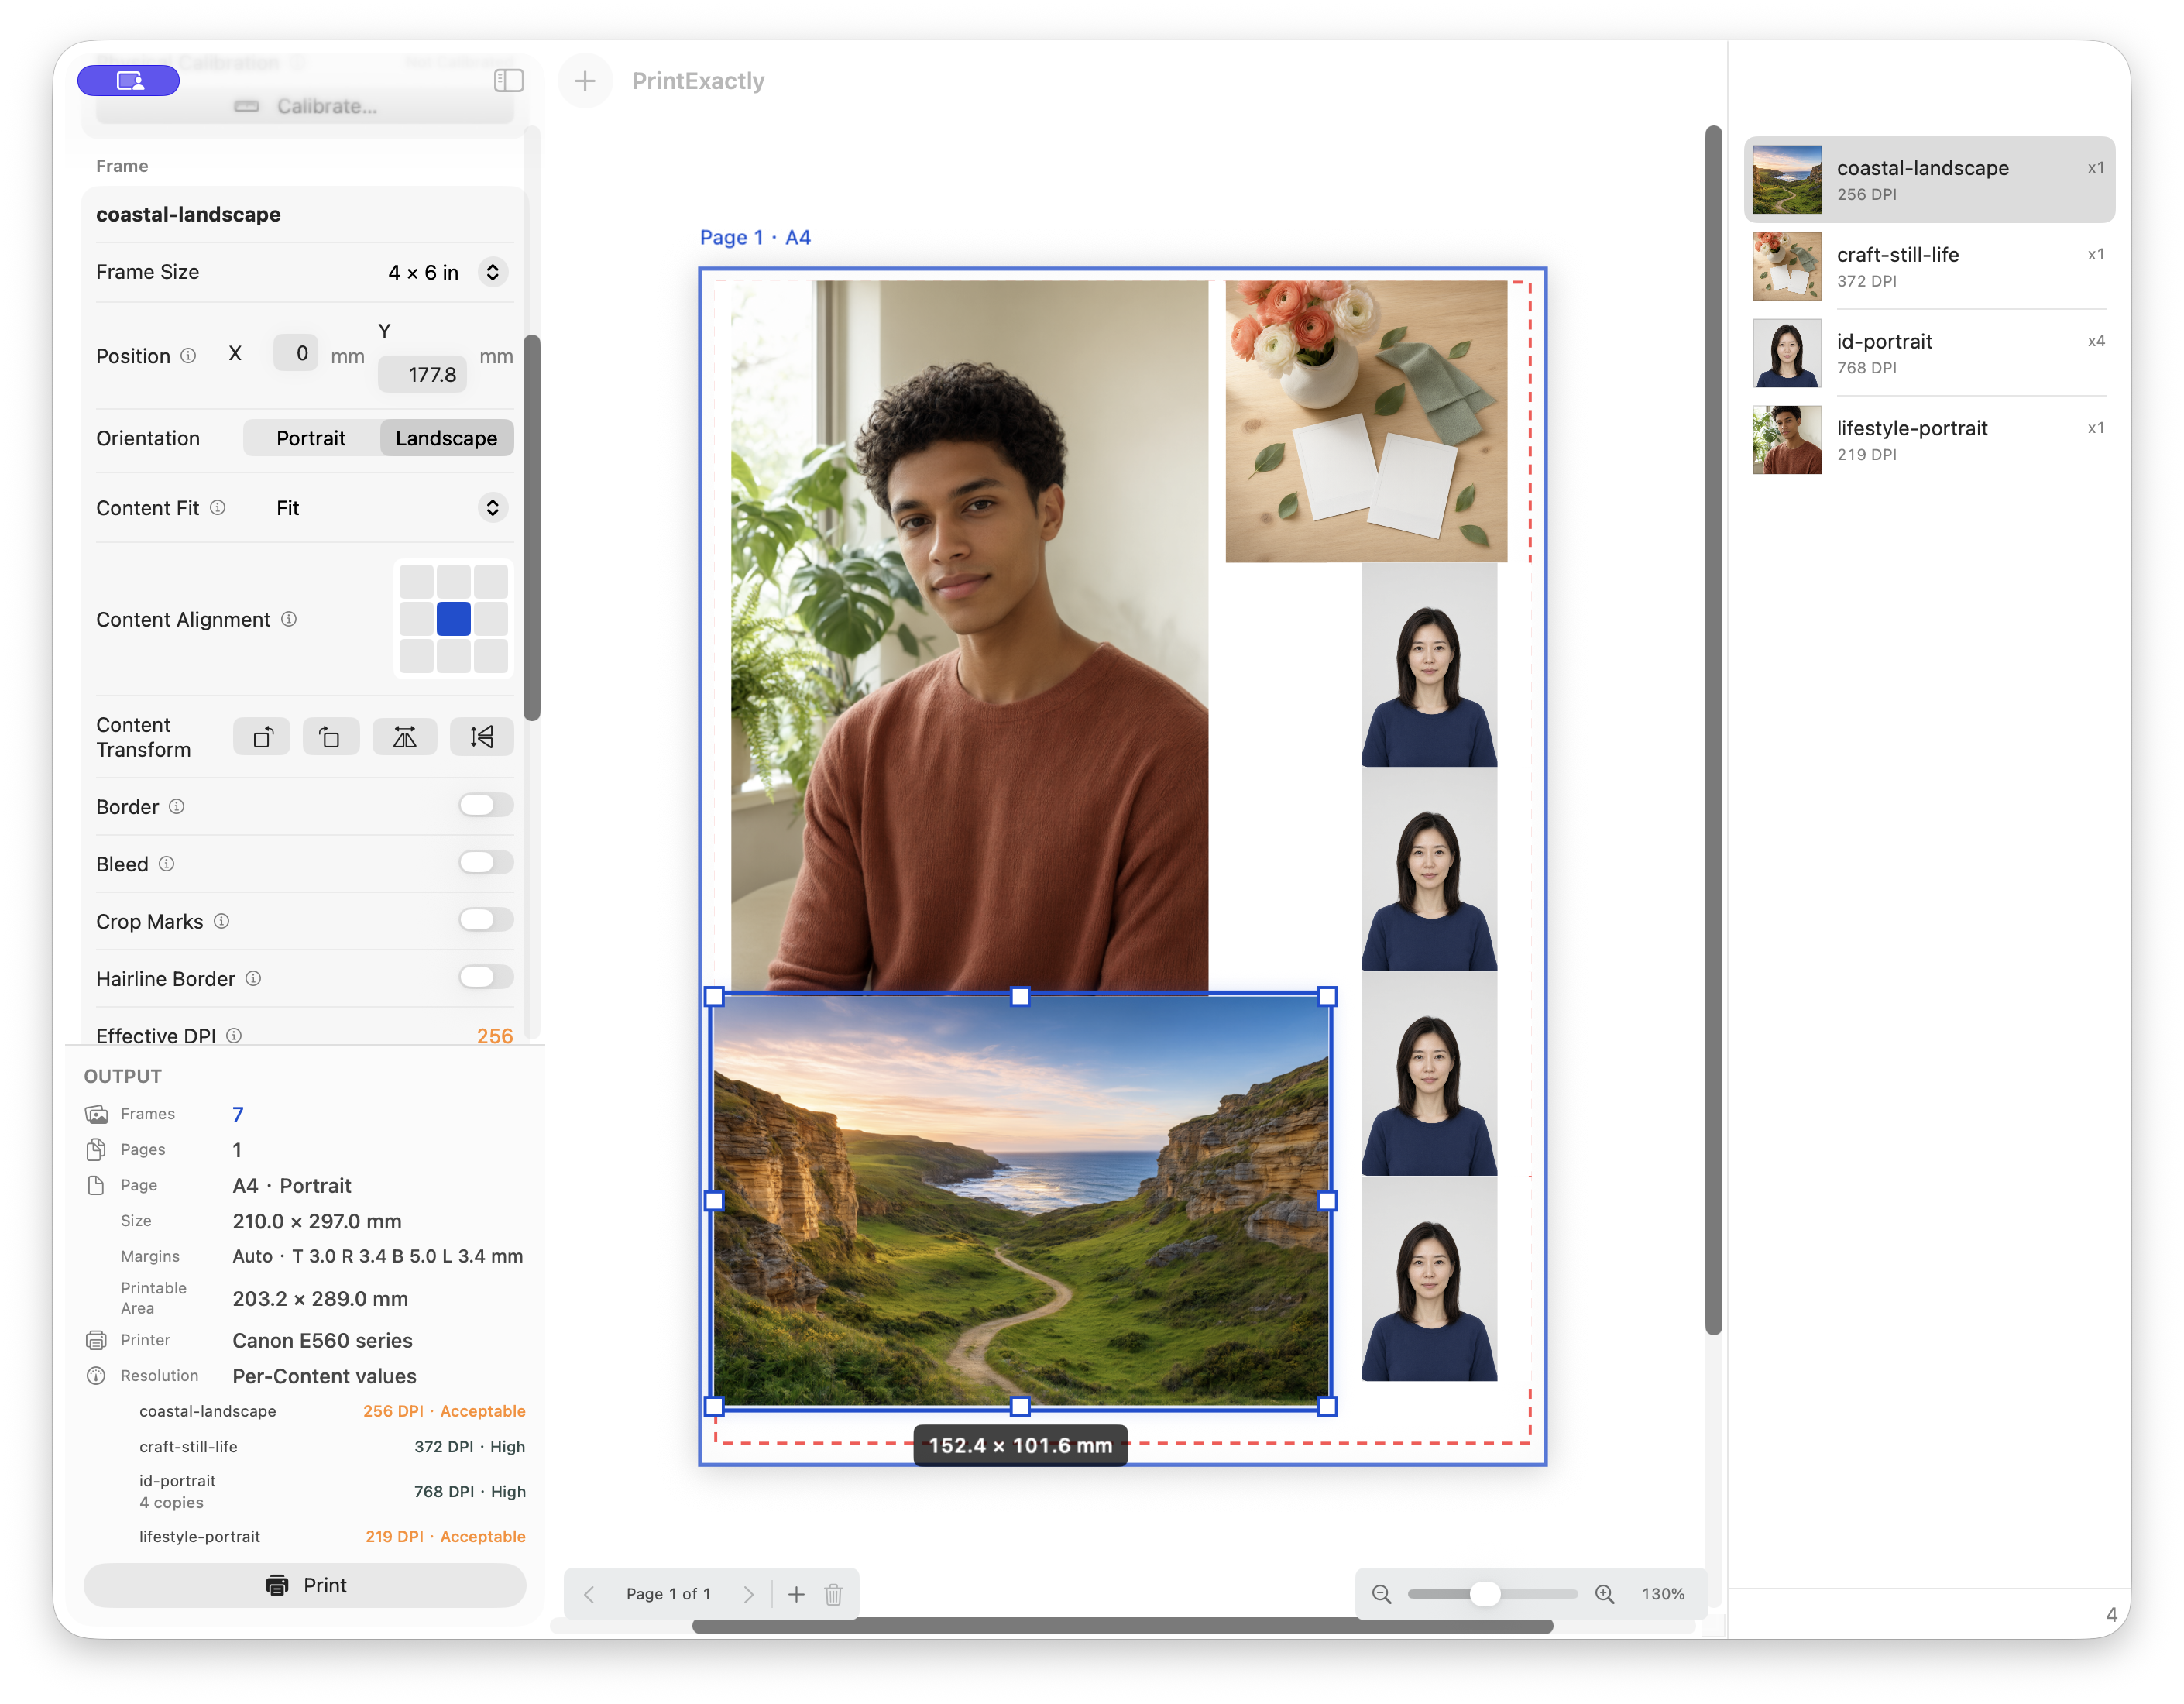
- Set the printer, Page, and Frame dimensions. Pick the printer you will actually use, choose a Page that printer reports (A4, US Letter, 4 × 6, or a stock from the printer's own media list), then type the Photo Frame width and height in millimeters, centimeters, or inches. Custom Frame dimensions go up to 2,000 mm per side. For a 4 × 6 inch Frame, type 4 in × 6 in — that is 101.6 × 152.4 mm exactly.
- Place the photo and set copies. Add the photo to the workspace, drag it onto the Page, snap to guides, and confirm the bounding box matches your Frame dimensions. Set copies per item, use Auto Arrange to pack the layout, or place photos by hand when the job needs it.
- Choose Content Fit. Pick Fit Entire to keep every pixel inside the Frame, Crop to Fill to fill edge to edge with a focal point, Fit Width to match Content width to Frame width, or Fit Height to match Content height to Frame height. The Frame's physical size does not change.
- Read the effective DPI. PrintExactly surfaces the per-item effective DPI for the Frame size you set. With an aspect ratio that matches the Frame and no additional Content zoom, a 1,200 × 1,800 photo at a 4 × 6 in Frame (101.6 × 152.4 mm) lands at exactly 300 DPI on both axes; the same source at an 8 × 12 in Frame drops to 150 DPI on both axes. Effective DPI is a layout-side check, not a print-quality guarantee.
- Match the macOS print panel and disable scaling. Set Paper Size to the paper loaded in the printer. Scale controls are driver-dependent: macOS exposes Scale and Scale to Fit under Paper Handling; some drivers expose their own Fit, Resampling, or Borderless controls in Printer Features. Set every available scale control to 100% / Off where the driver offers one. PrintExactly prints its generated PDF without page scaling and warns when printer, paper, orientation, or printable margins change.
- Measure one test print with a ruler. Print one copy at 100% and measure the finished photo against a physical ruler. If it differs from the Frame dimensions you entered, recheck paper handling, borderless mode, and driver scaling before printing the full job.
The pre-print driver and scaling checklist
- Match the document Page to the loaded paper. A mismatch can cause scaling or clipping, depending on driver settings. Set Page to A4, US Letter, 4 × 6, or whatever you actually loaded, then re-check after the print dialog opens.
- Set scale to 100% where the driver exposes it. macOS print panel Paper Handling shows Scale and Scale to Fit; some drivers hide them or expose them under a different label. Turn off Scale to Fit, and confirm the dialog reports 100%.
- Disable driver-side Fit and Resampling. Open the printer driver's own preferences (Printer Features, Options, or similar — labels vary by driver). Set Fit, Scale, or Resampling to Off or 100% where available.
- Read the printable-area warnings. PrintExactly flags any Frame that lands outside the active printer's printable area. Resolve by moving the Frame inward or shrinking the Frame size.
- Disable borderless if exact size matters. Borderless expansion is driver-dependent. For exact-size output, pick a bordered paper size or accept the small shift and measure one test print.
- Measure one copy with a physical ruler. Even with all settings correct, hardware feed and mechanical tolerance can drift a fraction of a millimetre. One ruler check before the full job is the cheapest insurance.
Scale to Fit, Fill Entire Paper, and Destination Paper Size are the three macOS print-panel settings that decide whether an exact-size Mac photo prints at its target dimensions or at whatever the dialog decides is "best fit."
— macOS Print Dialog
Effective DPI in plain numbers
Effective DPI is the printed pixels per inch of the source image at the Frame size you set — for these examples, assume the image's aspect ratio matches the Frame and no additional Content zoom is applied. Two clean examples so the math is obvious:
- 1,200 × 1,800 photo at 4 × 6 in Frame (101.6 × 152.4 mm). 1,200 ÷ 4 = 300 width, 1,800 ÷ 6 = 300 height — exactly 300 DPI on both axes.
- Same 1,200 × 1,800 photo at 8 × 12 in Frame (203.2 × 304.8 mm). 1,200 ÷ 8 = 150 width, 1,800 ÷ 12 = 150 height — 150 DPI on both axes.
Effective DPI is a layout-side warning, not a print-quality guarantee. Content Fit modes and any Content zoom change the scale the Content is actually printed at, and the source's intrinsic sharpness, compression, focus, and noise still matter. PrintExactly surfaces the per-item effective DPI for every Frame so obviously-soft prints are caught before you waste paper.
The three layers — Page, Photo Frame, Image Content
PrintExactly separates three layers. The Page is the paper and printer-reported printable area. The Photo Frame is the finished physical position and size on the Page, including finishing marks. The Image Content is the source pixel grid fitted or cropped inside that Frame. After this definition, the workspace shortens them to Page, Frame, and Content.
Content Fit modes
Fit Entire keeps every pixel of Content inside the Frame. Crop to Fill keeps the Frame at its target size and zooms Content to a focal point so the Frame is filled edge to edge. Fit Width matches Content width to Frame width; Fit Height matches Content height to Frame height. Every Fit mode is a persistent Content Fit choice. Fit Width and Fit Height scale Content proportionally to match the chosen Frame dimension without resizing the Frame, and they work alongside Content Alignment in both the canvas and the printed output.
Hardware and driver limits to acknowledge
- Borderless expansion shifts the actual printed size when the printer "fills" the paper.
- Paper feed and mechanical tolerance can drift output by a fraction of a millimetre.
- Printer drivers may apply a default scale to fit that you have to turn off.
- Different printer models report different printable areas for the same paper size.
PrintExactly reports the printer's printable area, prints its generated PDF without page scaling, and warns when the layout extends outside the printable area. Per-printer physical calibration can compensate for consistent scaling drift on a specific printer; it does not eliminate driver, paper, or hardware tolerance — that is what the test print and ruler measurement are for.
Compensate for consistent scaling drift with physical calibration
If one printer consistently prints a Frame slightly larger or smaller than the layout, PrintExactly can save an independent horizontal and vertical correction for that printer. Open the workspace, switch to the printer you want to calibrate, choose Calibrate, print the test Page, measure the printed result with a ruler, and enter the measurement. The saved correction is applied to printed Frames and Content, can be enabled or disabled at any time, and is independent of the macOS print dialog's 100% scale setting. Calibration cannot remove driver scaling, borderless expansion, paper feed, or mechanical drift — measure one test print before committing to the full job.
Frequently asked questions
How do I print a photo at exact size on Mac?
Set the Frame dimensions in millimeters, centimeters, or inches first, place the photo on the Page, check the output against the printer-reported printable area, then print through the macOS print panel at 100% scale with Scale to Fit off. PrintExactly flags clipping, prints its generated PDF without page scaling, and warns if printer, paper, orientation, or printable margins change.
What is the difference between exact size and fit to page?
Exact size prints the photo at its real physical Frame dimensions. Fit to page shrinks or enlarges the photo to fill the loaded paper, so the printed photo is rarely the size you typed. Turn off Scale to Fit in the macOS print panel before printing exact size.
How big can a Mac photo print at exact size?
PrintExactly accepts custom Frame dimensions in mm, cm, or inches up to 2,000 mm per side. Practical print limits also depend on source resolution, the selected paper, and printer capability.