
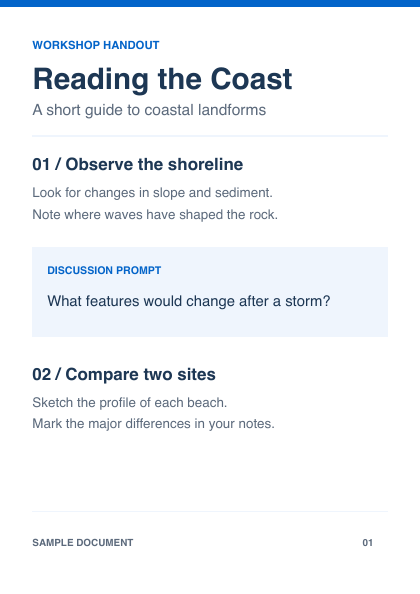
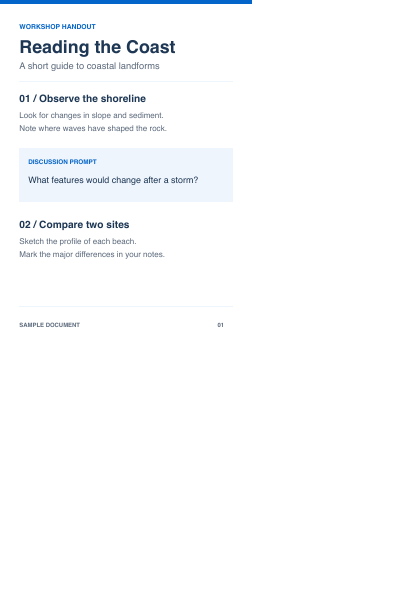
Both the original and exported pages are portrait A4 (210 × 297 mm). The export leaves 84 mm blank on the right for handwritten notes. The PDF Content scales proportionally to 126 × 178.2 mm and stays aligned at the top left. To preserve the original physical size instead, use the separate wider-output workflow below; that output is not A4 paper.
Page, Frame, and Content
The Page is the output paper. The Frame is the positioned rectangle containing a source page. Content is the PDF page inside its Frame. Page Margins reserve space for layout; they do not enlarge the Page or rescale the Frame. Frame Padding is different: it adds space inside the Frame, without changing its outside dimensions.
Alternate workflow: use wider output to preserve original size
- Set a wider output Page. Start with an empty layout. In Inspector → Page, choose Printer: No Printer, set Size to Custom, enter Width 297 mm and Height 350 mm, then choose Orientation: Landscape. Check that Page Size reads 350 × 297 mm. Set Margins to Custom: Top 0, Right 140, Bottom 0, Left 0 mm. The remaining Printable Area is 210 × 297 mm.
- Import the source PDF. Use File > Add Content… and choose an unencrypted, uniform A4 portrait PDF (210 × 297 mm per page). Select the needed page previews, or choose Import All. Imported pages become Frames at their original physical size; this example assumes each is one 210 × 297 mm page.
- Place one reference Frame in the printable area. Set up one reference Frame: keep it at 210 × 297 mm, with zero Border, Bleed, and Frame Padding, and set Content Fit to Fit and Content Alignment to Align Content to Top Left. Position the Frame in the 210 × 297 mm Printable Area. With these uniform page sizes, one Frame fills that area.
- Copy the reference Frame settings to the remaining Frames. Make sure the reference Frame is the only selected Frame — the command works with exactly one. Choose Edit > Copy Frame Settings; it is also in the right-click menu. In the Content sidebar, select the remaining PDF Frames — Shift selects a range, Command adds or toggles one — then choose Edit > Paste Frame Settings. Each target keeps its own Page and source PDF page and receives Frame size, position, Padding, Border, Bleed, Cut Marks, and Content arrangement in one undoable step. Page Size and Page Margins are not copied. This example is one Frame per Page: multiple pasted targets on the same Page would overlap. Check one Frame per Page and its order; with mixed sizes, check each Frame.
- Export and inspect the PDF. Choose File > Export PDF... to save the layout at 350 × 297 mm per Page. No physical printing or printer calibration is needed to create the PDF. Check several output pages, page count and order, the blank margin, and text selection in a PDF reader before using the whole document.
Dimensions for wider output only
To keep the original 210 × 297 mm PDF Content at full size and leave 40% of the final width blank, divide 210 mm by 0.6. The result is a 350 × 297 mm Page with 140 mm blank on the right. This is not A4 output.
When the paper size must stay A4
- Set Page Size to A4 and Orientation to Portrait; verify Page Size reads 210 × 297 mm. Set Margins to None (0 on every side).
- Keep the Frame at 210 × 297 mm, with Border and Bleed at 0. In the Content sidebar, select every intended PDF Frame (Shift selects a range; Command adds or toggles one).
- In Inspector → Frame Padding, enable Set Sides Separately. Set only the right side to 84 mm; leave the other sides at 0. This unlinks sides, it does not scale them.
- Set Content Fit to Fit and Content Alignment to Align Content to Top Left. The available area is 126 × 297 mm, so A4 Content scales proportionally to 126 × 178.2 mm.
- Before export, check the selected Frames, zero Border/Bleed, and right-only padding. You can copy settings from one reference Frame and paste them to the other selected PDF Frames, or batch-edit directly.
This option does not preserve the original physical print size. The 84 mm is Frame Padding only; Margins stay None. Do not count the same space again as a Page Margin.
What this workflow does not do
- The export keeps the PDF drawing vector-capable; output Pages are not screenshots. Text PDFs can retain selectable text, while scanned pages stay images with no OCR.
- Encrypted or printing-restricted PDFs are unsupported. PDF annotations and form fields are not carried over, and the app does not edit or reflow PDF text.
- This is the manual Mac workflow above: a layout holds up to 100 Pages, and this is not an iPad app or a one-click handout generator. The app does not add ruled, grid, or dot paper, and it does not insert blank Pages automatically.
- Save or export the result as a new file, then check the samples, Page count, and order, and verify text selection, search, and handwriting in your destination PDF reader or note app. There is no all-app compatibility promise.
Frequently asked questions
How much room does this example add for notes?
The final Page is 350 mm wide, with a 140 mm right margin and 210 mm of usable width. The original A4 page remains 210 mm wide: it occupies 60% of the final width, and the note margin occupies 40%. The margin is 140 ÷ 350, not 40% of the source width.
Does adding a Page margin shrink the original PDF page?
No. Page margins reserve packing area; they do not resize the Page or rescale existing Frames. This workflow uses a larger output Page and keeps the imported Frame at 210 × 297 mm.
Can I instead fit the page on fixed A4 paper?
Yes. Use A4 in Portrait orientation, Margins None, and 84 mm of right-only Frame Padding. The PDF page scales to 126 × 178.2 mm, so it no longer retains its original print size. See the fixed-A4 steps
Does Copy Frame Settings work like Copy and Paste for whole Frames?
No. Edit > Copy Frame Settings and Edit > Paste Frame Settings change the selected target Frames in place: they receive the reference Frame's size, Page-local position, Frame Padding, Border, Bleed, Cut Marks, and Content arrangement while keeping their own Page and source PDF page. Edit > Copy Frame (Command-C) and Edit > Paste Frame (Command-V) instead create new Frames that include the copied source page and leave existing Frames untouched, so they are not a way to restyle pages that are already placed.
Does the app create ruled note templates or blank pages automatically?
No. This workflow creates blank margin space only. It does not add ruled, grid, or dot paper, insert a blank page after each source page, or reflow PDF text. PDF annotations and form fields are not carried over.