
Direct answer. Set the finished size on the photo's Frame, then enable bleed, crop marks, and any border or hairline on that selected Frame or group. Bleed extends past the finished edge, crop marks sit outside it, and a solid border stays inside it. Before printing, confirm the whole footprint fits the printable area the driver reports for your paper, print at 100%, and measure the finished Frame with a ruler.
Find bleed and crop marks on the selected Frame
Select the Frame or group you want to finish, then scroll the Inspector to the Bleed and Crop Marks controls. Everything you set there applies to that selected Frame or group only.
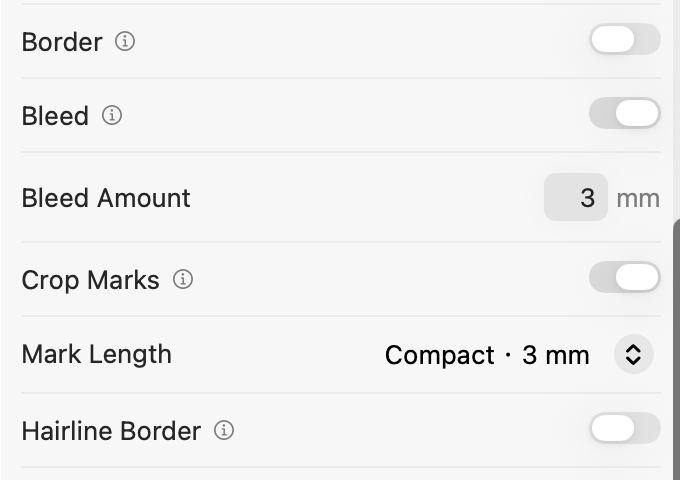
Image cropping and printed cut marks are different
Two separate ideas are easy to mix up. Image cropping decides which part of the source photo fills the Frame, using the Content fit settings. Printed cut marks are thin lines on the paper that show where to cut. Cropping never adds a line to the print, and cut marks never change which part of the photo appears. In PrintExactly's order, the Page holds the paper and printable area, the Frame is the finished position and size, and the Content is the source image inside that Frame.
How bleed, border, hairline, and crop marks fit around a Frame
Each finishing element sits at a specific distance from the finished edge:
- Bleed extends beyond the finished edge. When a border is enabled, bleed extends the border color. Otherwise, crop-to-fill extends the image, and other fit modes extend a white background while the fitted image stays inside the finished photo.
- Border is a solid band drawn inside the finished Frame. It does not change the Frame's dimensions.
- Hairline border is a 0.25 pt line just inside the finished edge. It stays on the print, unlike external crop marks.
- Crop marks are 0.25 pt lines outside the bleed, or outside the finished edge when no bleed is set. They come in compact or standard length.
Every one of these settings belongs to the selected Frame or group. A setting you change on one photo does not change the rest of the workspace.
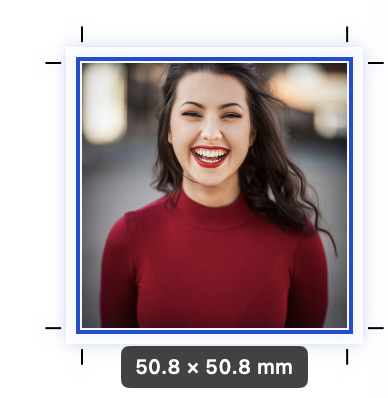
Worked example: a 2 × 2 in Frame with 2 mm bleed
Take a finished 2 × 2 in (50.8 × 50.8 mm) Frame with 2 mm of bleed on each side. The bleed-inclusive area is 50.8 + 2 + 2 = 54.8 × 54.8 mm, before crop marks and any gaps between Frames. A border inside the finished Frame does not enlarge this footprint, because it is drawn within the 50.8 mm edge. Crop marks and gaps are added around that 54.8 mm area, so leave room for them when you arrange several Frames on one Page.
Choose the printer, paper, and printable area first
Start on the Page: pick the printer you will use and the paper loaded in it. PrintExactly reads the printable area that the selected driver reports for that paper. The entire finishing footprint, meaning the Frame plus bleed, crop marks, and gaps, must fit inside that area. If the driver reports no printable area, PrintExactly uses fallback margins that are not measured from your printer. Treat those as unverified and leave extra room.
Paper dimensions alone do not prove that a layout fits, and the app does not promise that every driver will expand or reposition output in the same way. If a warning appears, reduce the number of Frames, reduce the Frame size or bleed, or choose larger supported paper.
Print at 100%, cut with care, and measure
- Choose the printer and loaded paper on the Page. Select the printer you will actually use and the paper loaded in it. Then read the printable area that the driver reports for that paper. If the driver reports none, PrintExactly uses fallback margins that are not measured from your printer, so treat them as a rough guide only.
- Set the finished Frame size. Enter the finished Frame size, for example 2 × 2 in (50.8 × 50.8 mm). This is the size of the photo after cutting, and it is the number you will measure at the end.
- Enable bleed for the selected Frame. Choose a bleed amount on the selected Frame or group. Bleed extends past the finished edge and can help prevent a white sliver after trimming when the content extends into the bleed. Bleed is not a setting for the whole workspace.
- Add a border or hairline if needed. A solid border is drawn inside the finished Frame and does not change the Frame's dimensions. A hairline border is a 0.25 pt line just inside the finished edge that stays on the print, unlike external crop marks. Enable either, both, or neither, depending on how the print will be cut.
- Enable crop marks and check the footprint. Enable crop marks for the selected Frame or group. Marks are 0.25 pt lines placed outside the bleed, or outside the finished edge when no bleed is set, in compact or standard length. Confirm that the whole footprint, including bleed, crop marks, and the gaps between Frames, sits inside the printable area of the printer and paper you selected.
- Print at 100 percent. Set scale to 100 percent in the macOS print dialog. Turn off any scale-to-fit or fit-to-paper option in the print dialog and driver options where one is offered. Driver-specific scaling and borderless settings still need a manual check, because PrintExactly cannot control every driver.
- Cut with care and measure the finished Frame. Cut along the crop marks or the trim outline, not the bleed. Measure the finished Frame with a ruler. If it differs from the entered size, check paper feed, borderless mode, and scaling before printing again.
Measuring the finished Frame is the test that matters. The printed bleed and crop marks help you cut, but the finished photo should match the Frame size you entered. Measurement shows how your printer and cutting behaved on that day; it is not a certified accuracy standard.
Layout presets keep finishing settings, not photos
When you save a layout as a preset, the preset stores Page and ordered Frame geometry and finishing, including bleed, crop marks, and borders. It does not store photos or each photo's Content crop, fit, zoom, rotation, or flips. Applying a preset also does not switch the selected printer. To reuse a sheet with its finishing, read the preset guide.
Related workflows
For a photo that should print at its exact physical size without finishing marks, use the exact-size guide. For small photos arranged on a scrapbook page, see the scrapbook guide. For a borderless print that runs to the paper edge, see the borderless guide. To check a size before you lay out the sheet, use the photo print size calculator.
Frequently asked questions
What is the difference between image cropping and printed cut marks?
Image cropping decides which part of the photo appears inside a Frame; the Frame and its content can be adjusted separately. Crop marks are thin printed lines outside the finished edge that show where to cut the paper. Crop marks do not change the photo's content.
Does a border make the Frame bigger?
No. A solid border is drawn inside the finished Frame, so the Frame dimensions stay the same. Bleed and crop marks, by contrast, are outside the finished edge and do add to the space the Frame needs on the page.
Are bleed and crop marks applied to every photo on the sheet?
No. Bleed, border, hairline, and crop-mark settings belong to the selected Frame or group, not to the whole workspace. Set them on each Frame that needs them.
Will bleed always fill the edge of my print?
When a border is enabled, bleed extends the border color, which takes priority over crop-to-fill. Otherwise, it extends the image when the crop-to-fill fit mode is used. Other fit modes extend a white background, and the fitted image stays inside the finished photo. Check the preview for the fit mode you chose.
Does PrintExactly guarantee that my printer will print bleed or cut marks exactly?
No. PrintExactly lays out the finished Frame, bleed, and crop marks on the page you selected and warns about the printable area the driver reports. Your printer, paper, and cutting accuracy still determine the final result, so measure a test print before relying on it.